Creating a Failover Cluster
Checklist: Creating a Failover Cluster
| Status | Task | Reference |
|---|---|---|
| ☐ | Verify prerequisite conditions | Verify prerequisite conditions |
| ☐ | Install Failover Clustering feature on each server you want to add as a cluster node | Install Failover Clustering feature |
| ☐ | Run Cluster Validation Wizard to check configuration | Check configuration |
| ☐ | Run Create Cluster Wizard to create the failover cluster | Create failover cluster |
| ☐ | Create clustered roles to contain workloads on the cluster | Create clustered roles |
Verify Prerequisite Conditions
Before you begin, confirm the following prerequisite conditions:
-
Ensure all servers you want to add as cluster nodes are running the same version of Windows Server.
-
Review hardware requirements to ensure your configuration is supported. For more information, see Hardware Requirements and Storage Options of Failover Clustering. If creating a Storage Spaces Direct cluster, see Hardware Requirements for Storage Spaces Direct.
-
To add clustered storage during cluster creation, ensure all servers can access the storage. (Clustered storage can also be added after cluster creation.)
-
Ensure all servers you want to add as cluster nodes are joined to the same Active Directory domain.
-
(Optional) Create an Organizational Unit (OU) and move computer accounts for servers you want to add as cluster nodes into this OU. As a best practice, we recommend placing failover clusters in their own OUs in AD DS. This can help you better control Group Policy settings or security templates affecting cluster nodes. By isolating clusters in their own OUs, it also helps prevent accidental deletion of cluster computer objects.
-
Additionally, confirm the following account requirements:
- Ensure the account you use to create the cluster is a domain user with administrative rights on all servers you want to add as cluster nodes.
- Ensure one of the following is true:
- The user creating the cluster has Create Computer Objects rights to the OU or container where the servers will form a cluster.
- If the user lacks Create Computer Objects rights, request a domain administrator to pre-create a cluster computer object for the cluster. For more information, see Pre-create Cluster Computer Objects in Active Directory Domain Services.
Note: This requirement does not apply if you are creating a non-Active Directory-based cluster in Windows Server 2012 R2. For more information, see Deploy Non-Active Directory-Based Clusters.
Reference
Step 1: Install Failover Clustering Feature
You need to install the Failover Clustering feature on each server you want to add as a failover cluster node.
Step 2: Install Failover Clustering Feature
- Start Server Manager.
- On the Manage menu, select Add Roles and Features.
- On the Before you begin page, select Next.
- On the Select installation type page, choose Role-based or feature-based installation and then select Next.
- On the Select destination server page, choose the server where you want to install the feature and then select Next.
- On the Select server roles page, choose Next.
- On the Select features page, check the Failover Clustering box.
- To install the failover cluster management tools, choose Add Features and then select Next.
- On the Confirm installation selections page, choose Install. (No need to restart the server after installing the Failover Clustering feature.)
- When the installation process completes, select Close.
Repeat this process on each server you want to add as a failover cluster node.
Check Cluster Configuration
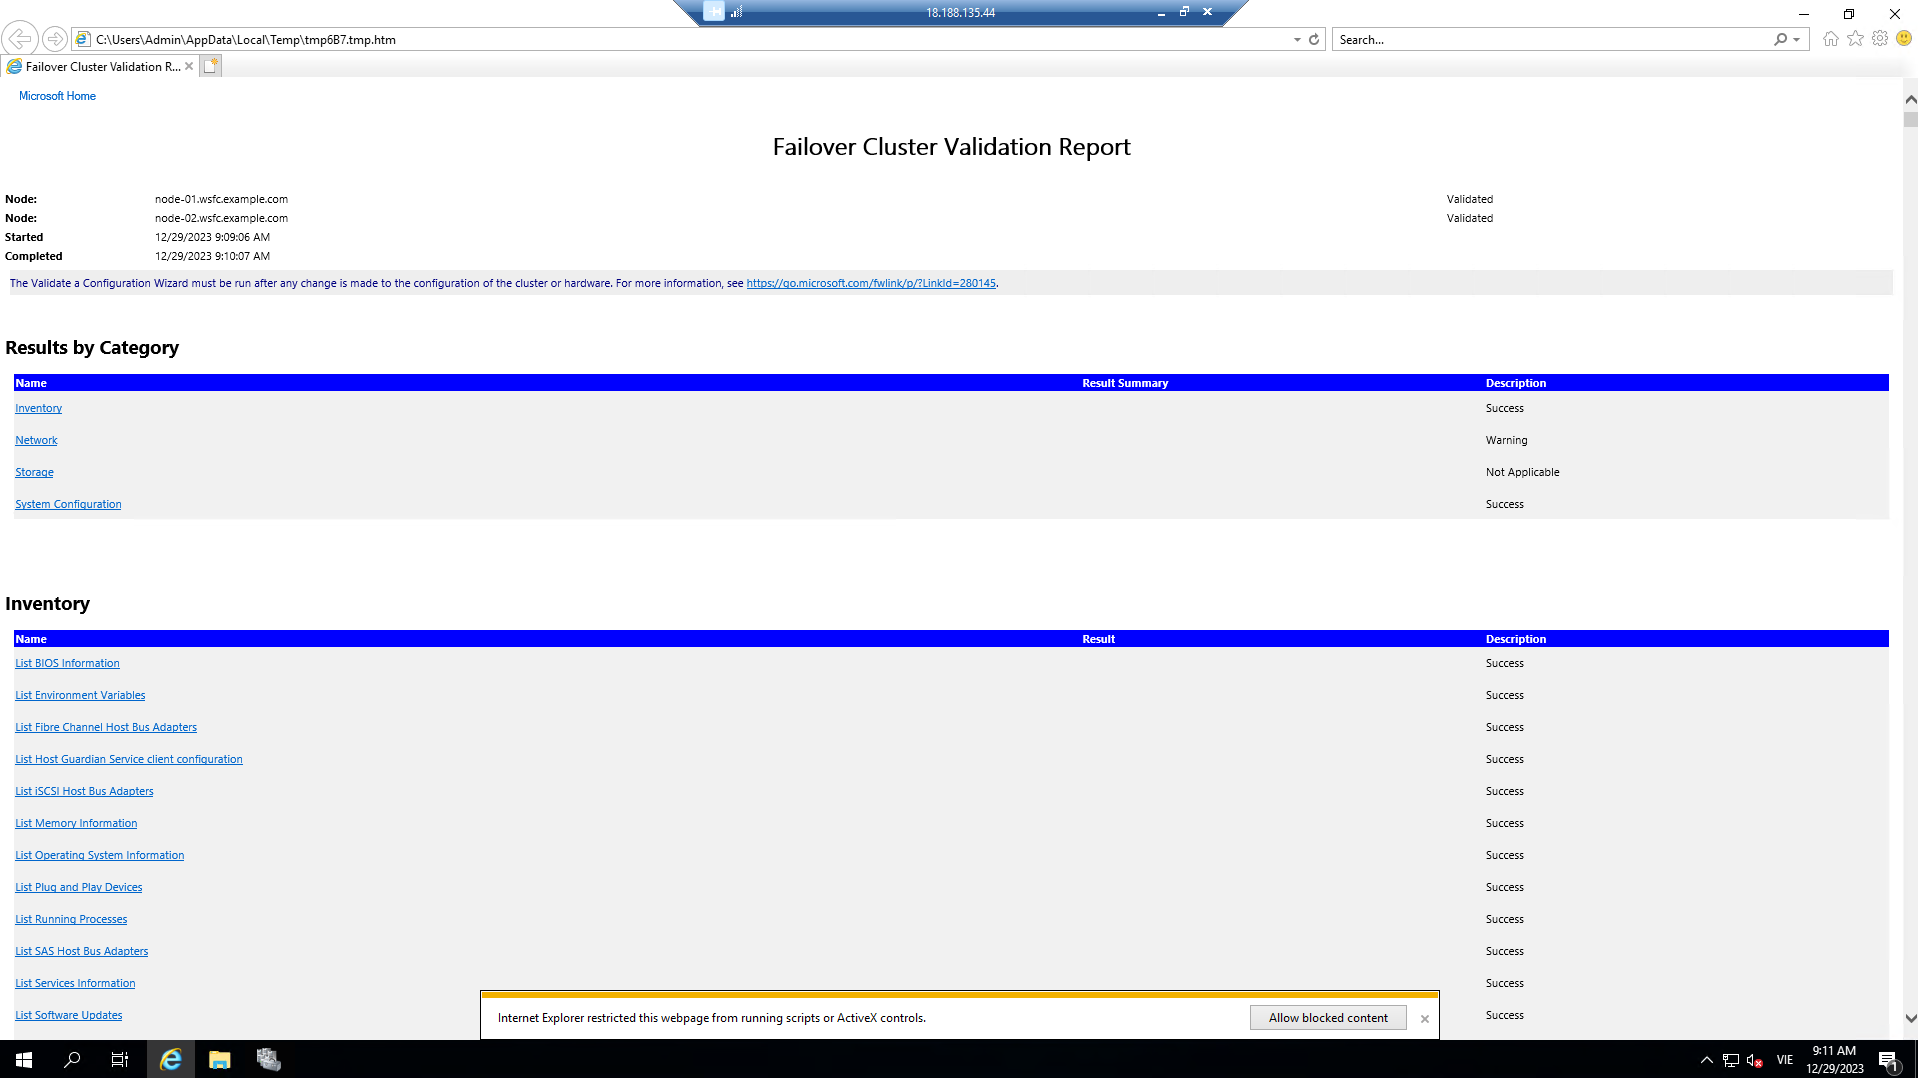
Run Cluster Validation Checks
-
On a computer with the Failover Cluster Management Tools installed from the Remote Server Administration Tools or on a server with the Failover Clustering feature installed, start Failover Cluster Manager. Do this on a server by starting Server Manager and then, on the Tools menu, select Failover Cluster Manager.
-
In the Failover Cluster Manager pane under Management, select Validate Configuration.
-
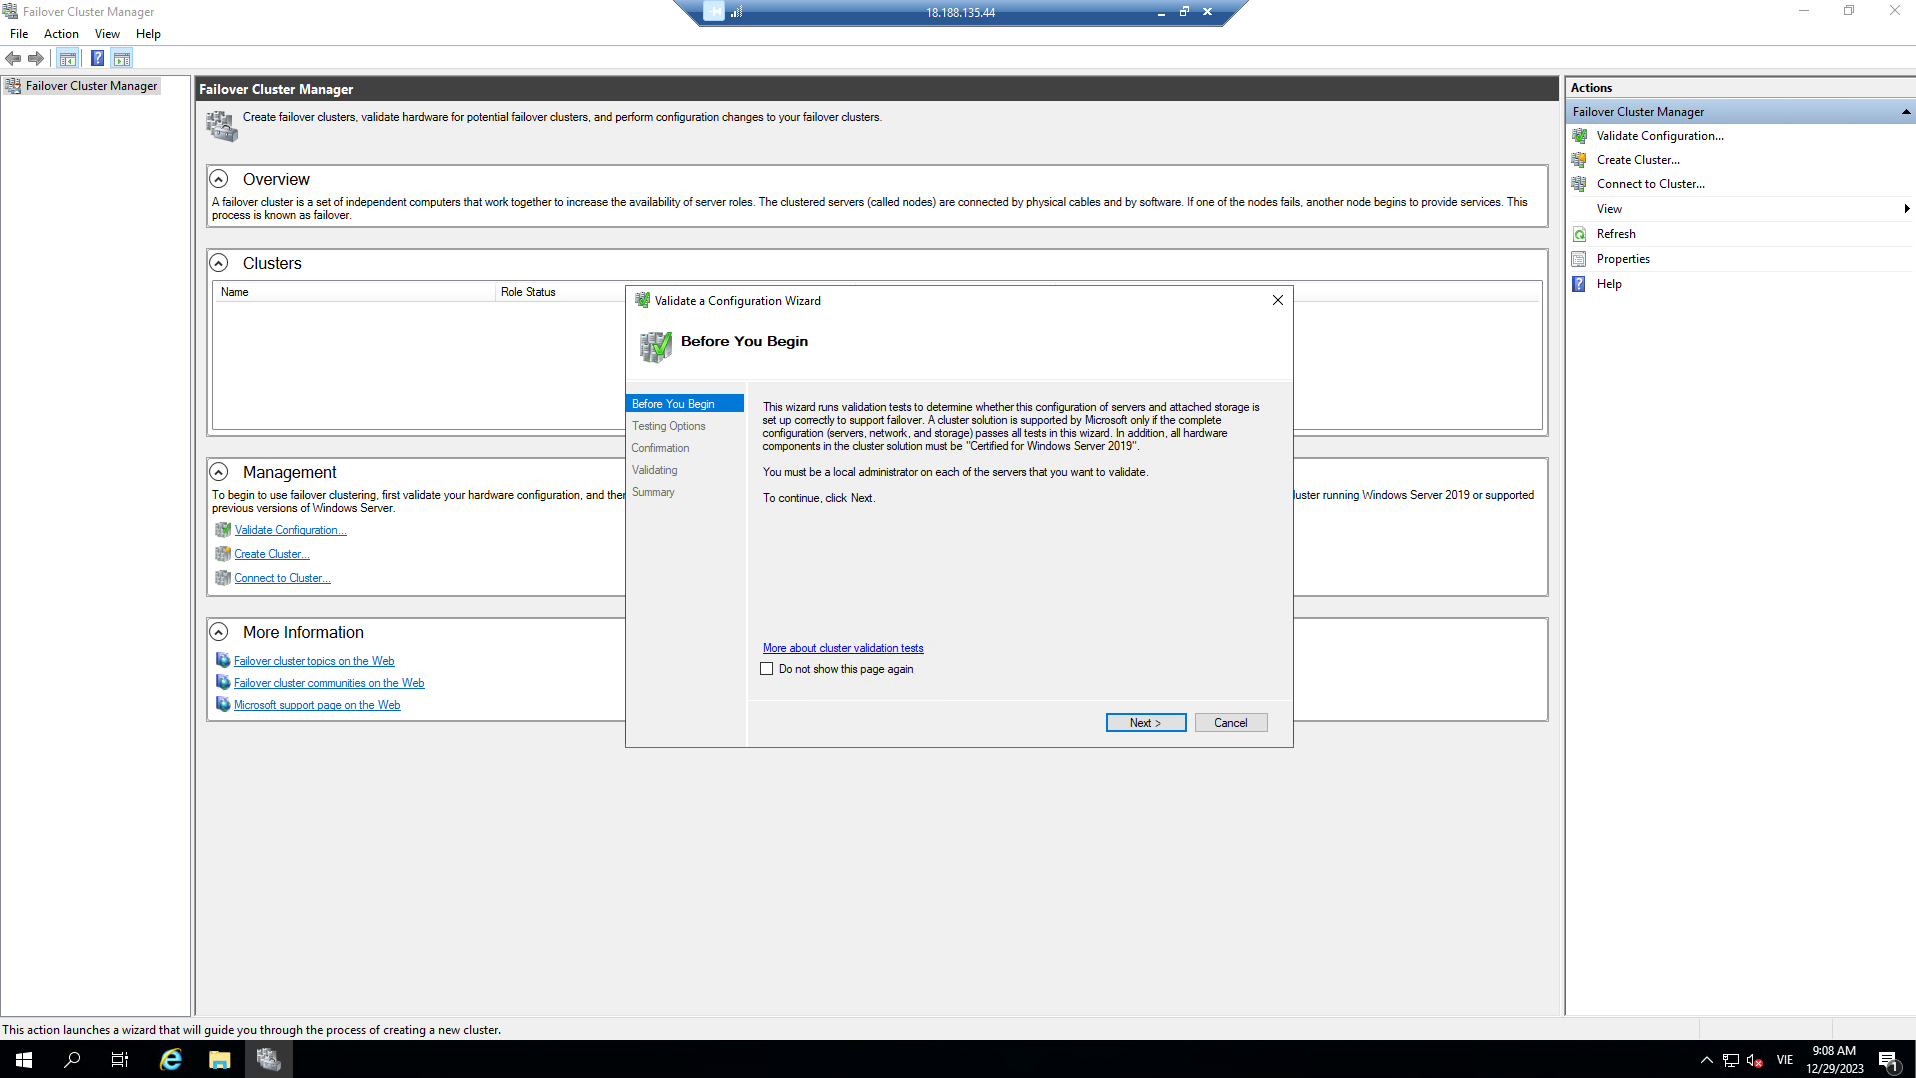
On the Before You Begin page, select Next.
-
On the Select Servers or a Cluster page in the Enter name box, type the NetBIOS or fully qualified domain name of a server you intend to add as a failover cluster node and then select Add. Repeat this step for each server you want to add. To add multiple servers at once, separate the names with commas or semicolons. For example, type names in the format server1.contoso.com, server2.contoso.com. When finished, select Next.
-
On the Testing Options page, choose Run all tests (recommended) and then select Next.
-
On the Confirmation page, select Next.
-
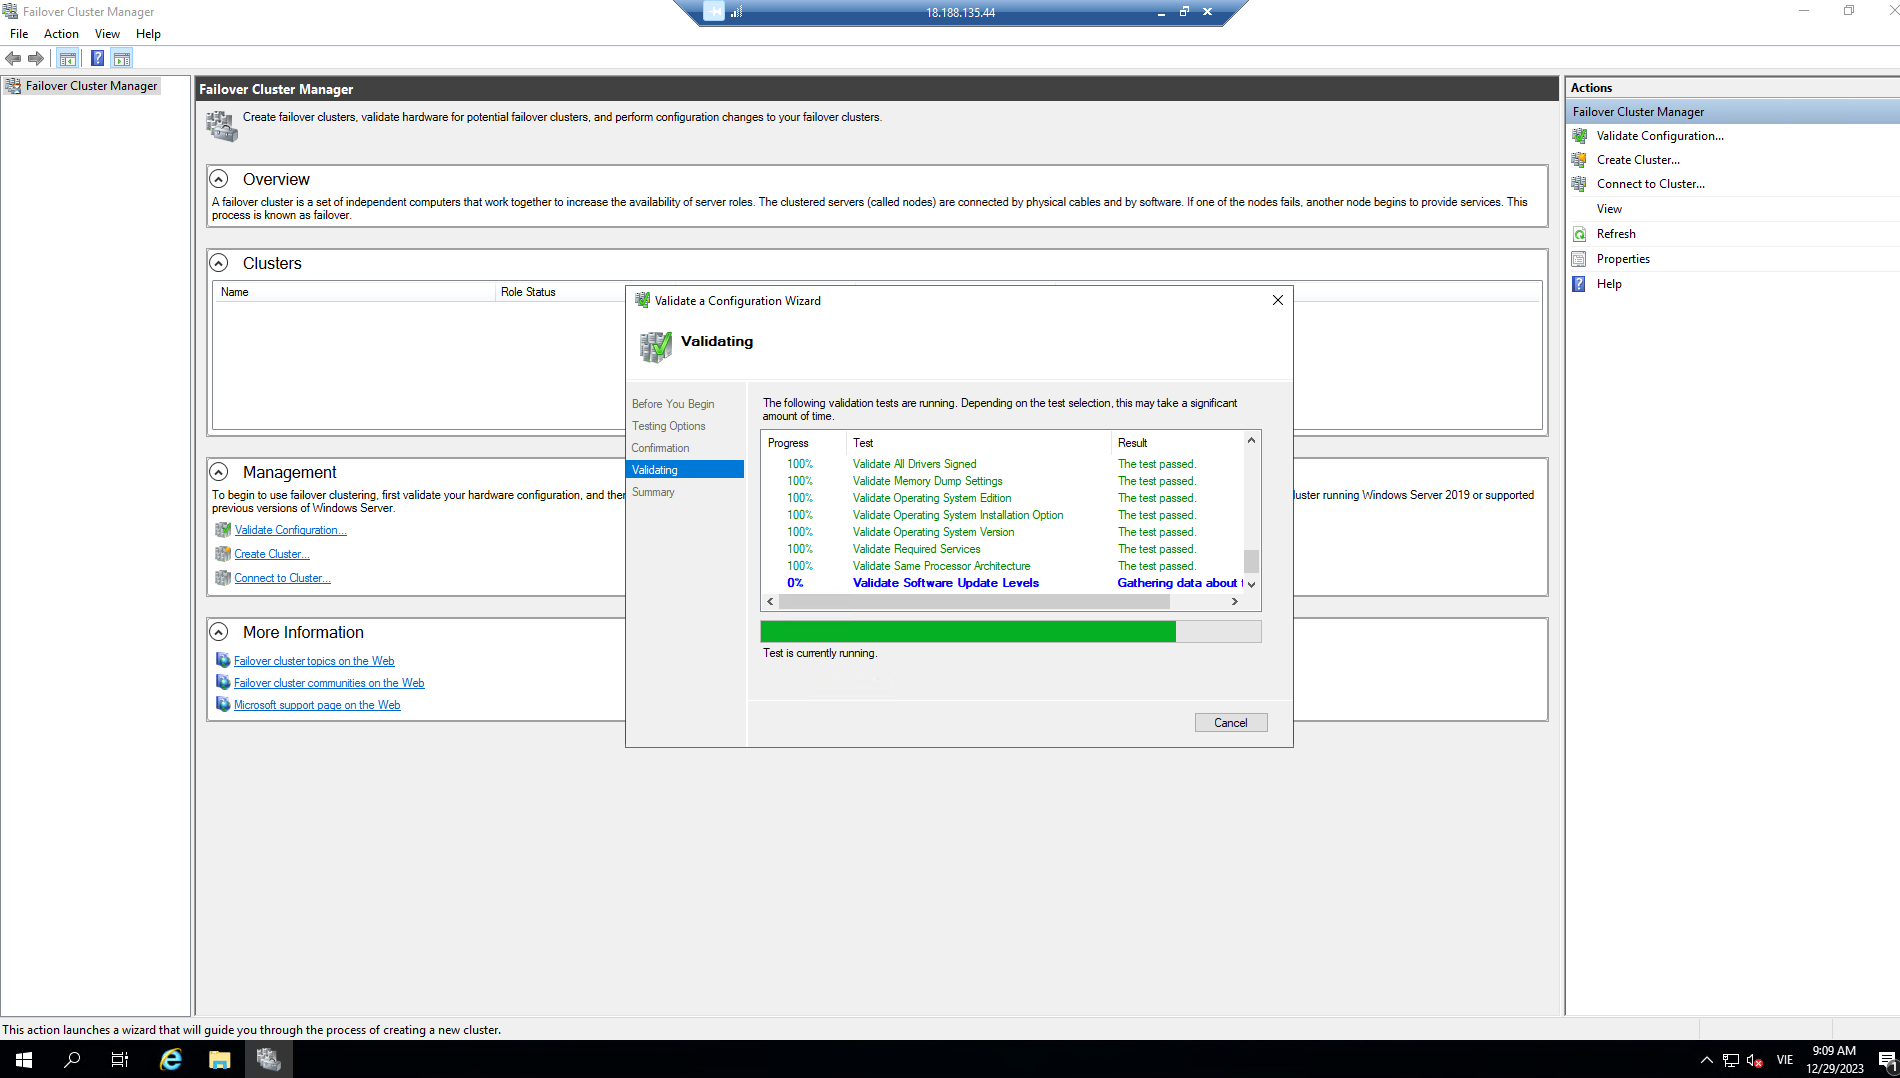
The Confirmation page displays the status of the tests running.
-
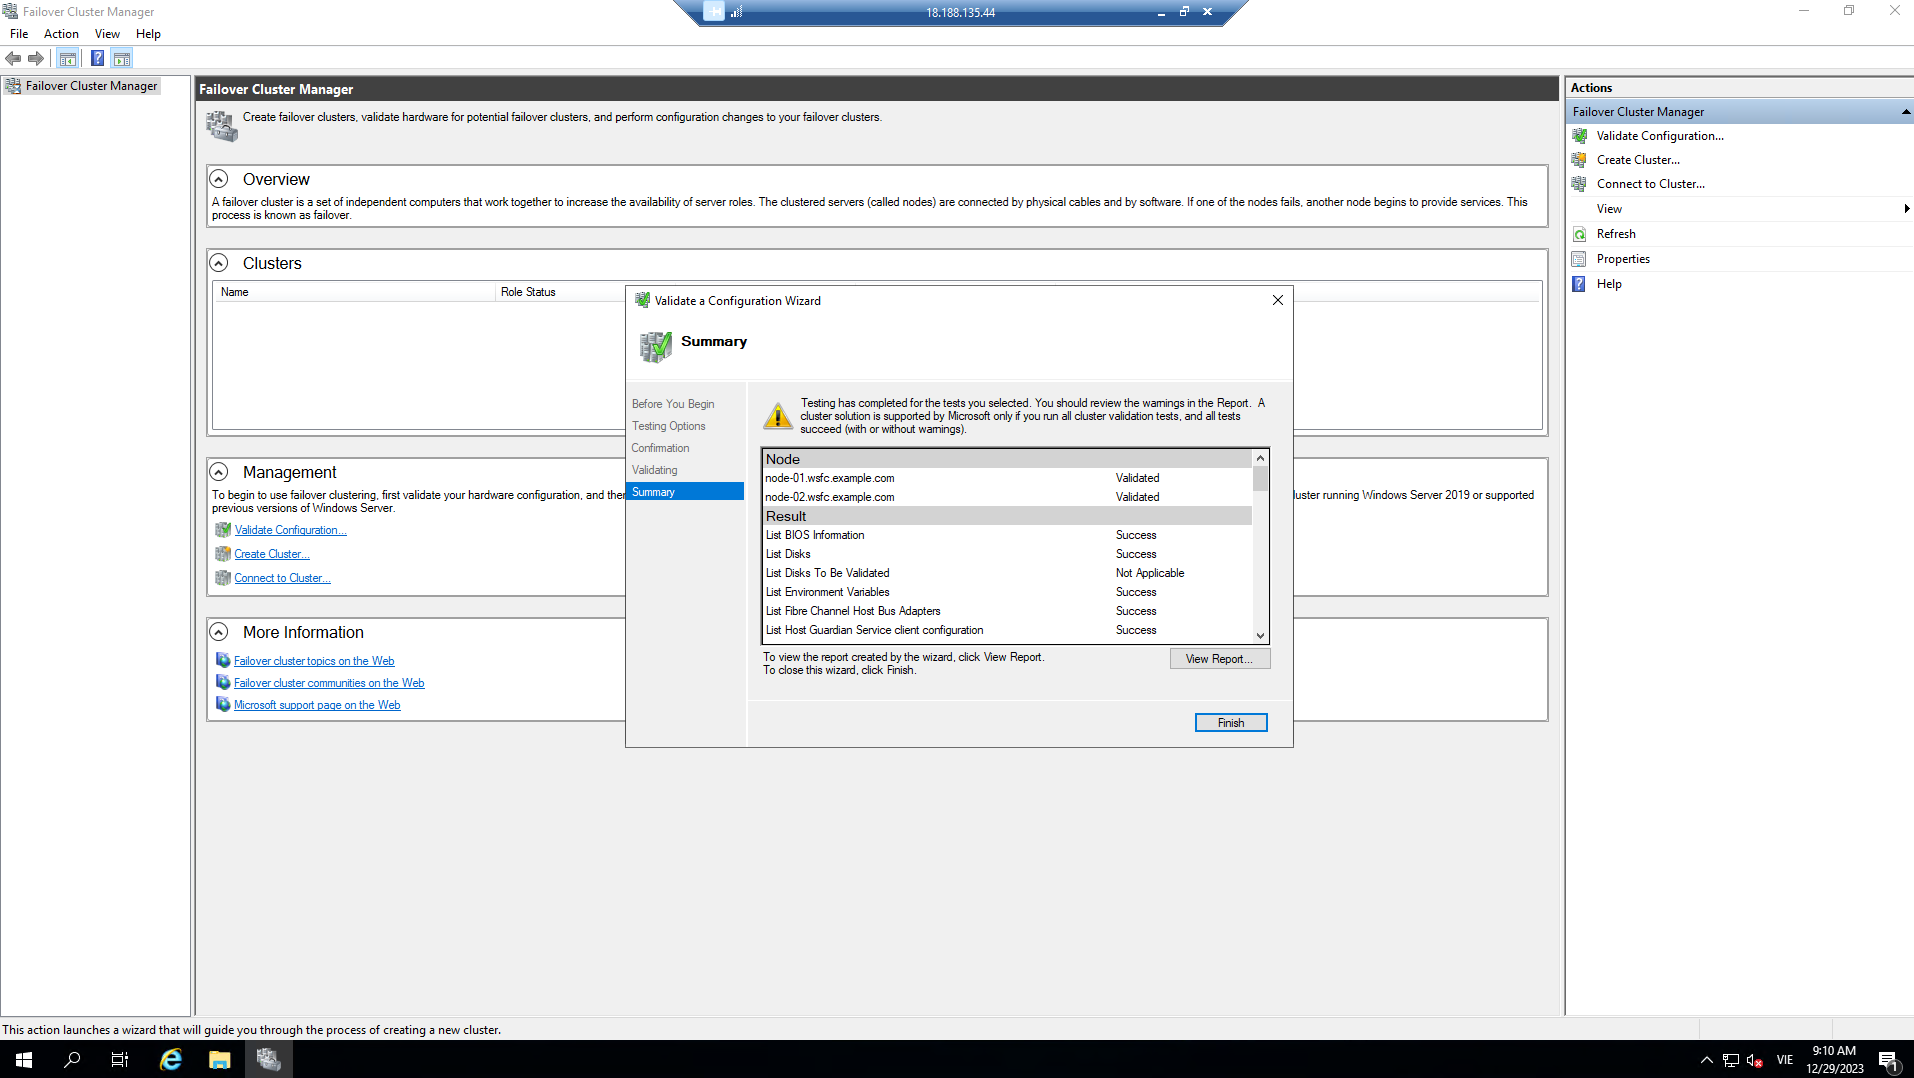
On the Summary page, perform one of the following:
- If the results indicate the tests completed successfully and the configuration is suitable for immediately creating a cluster, ensure the Create the cluster now using the validated nodes checkbox is selected and then select Finish. Then, proceed to step 4 of the Create the failover cluster procedure.
- If the results show warnings or errors, select View Report to see details and identify issues that need to be addressed. Remember that a warning for a particular validation test indicates that this aspect of the failover cluster might be supported but may not meet recommended best practices.
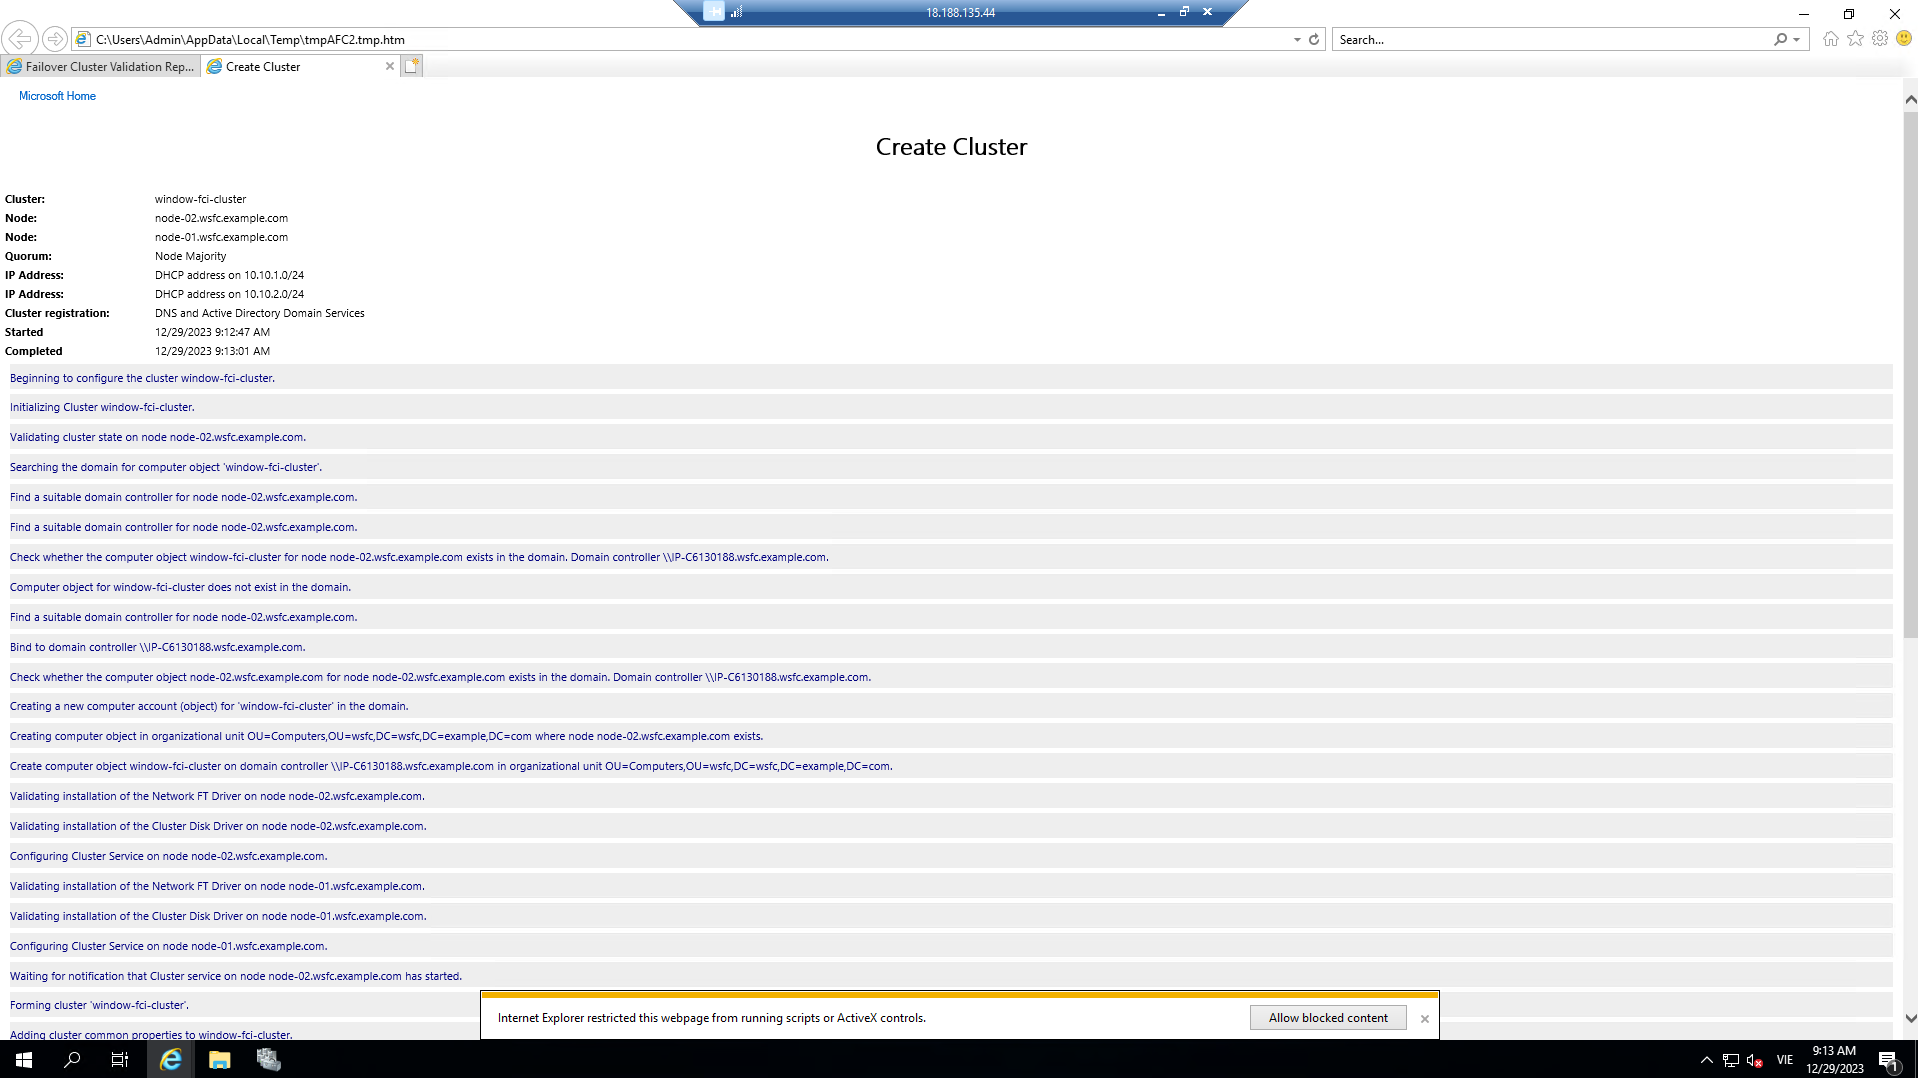
Create Failover Cluster
- In the Tools menu, select Failover Cluster Manager.
-
In the Failover Cluster Manager pane, under Management, select Create Cluster.
-
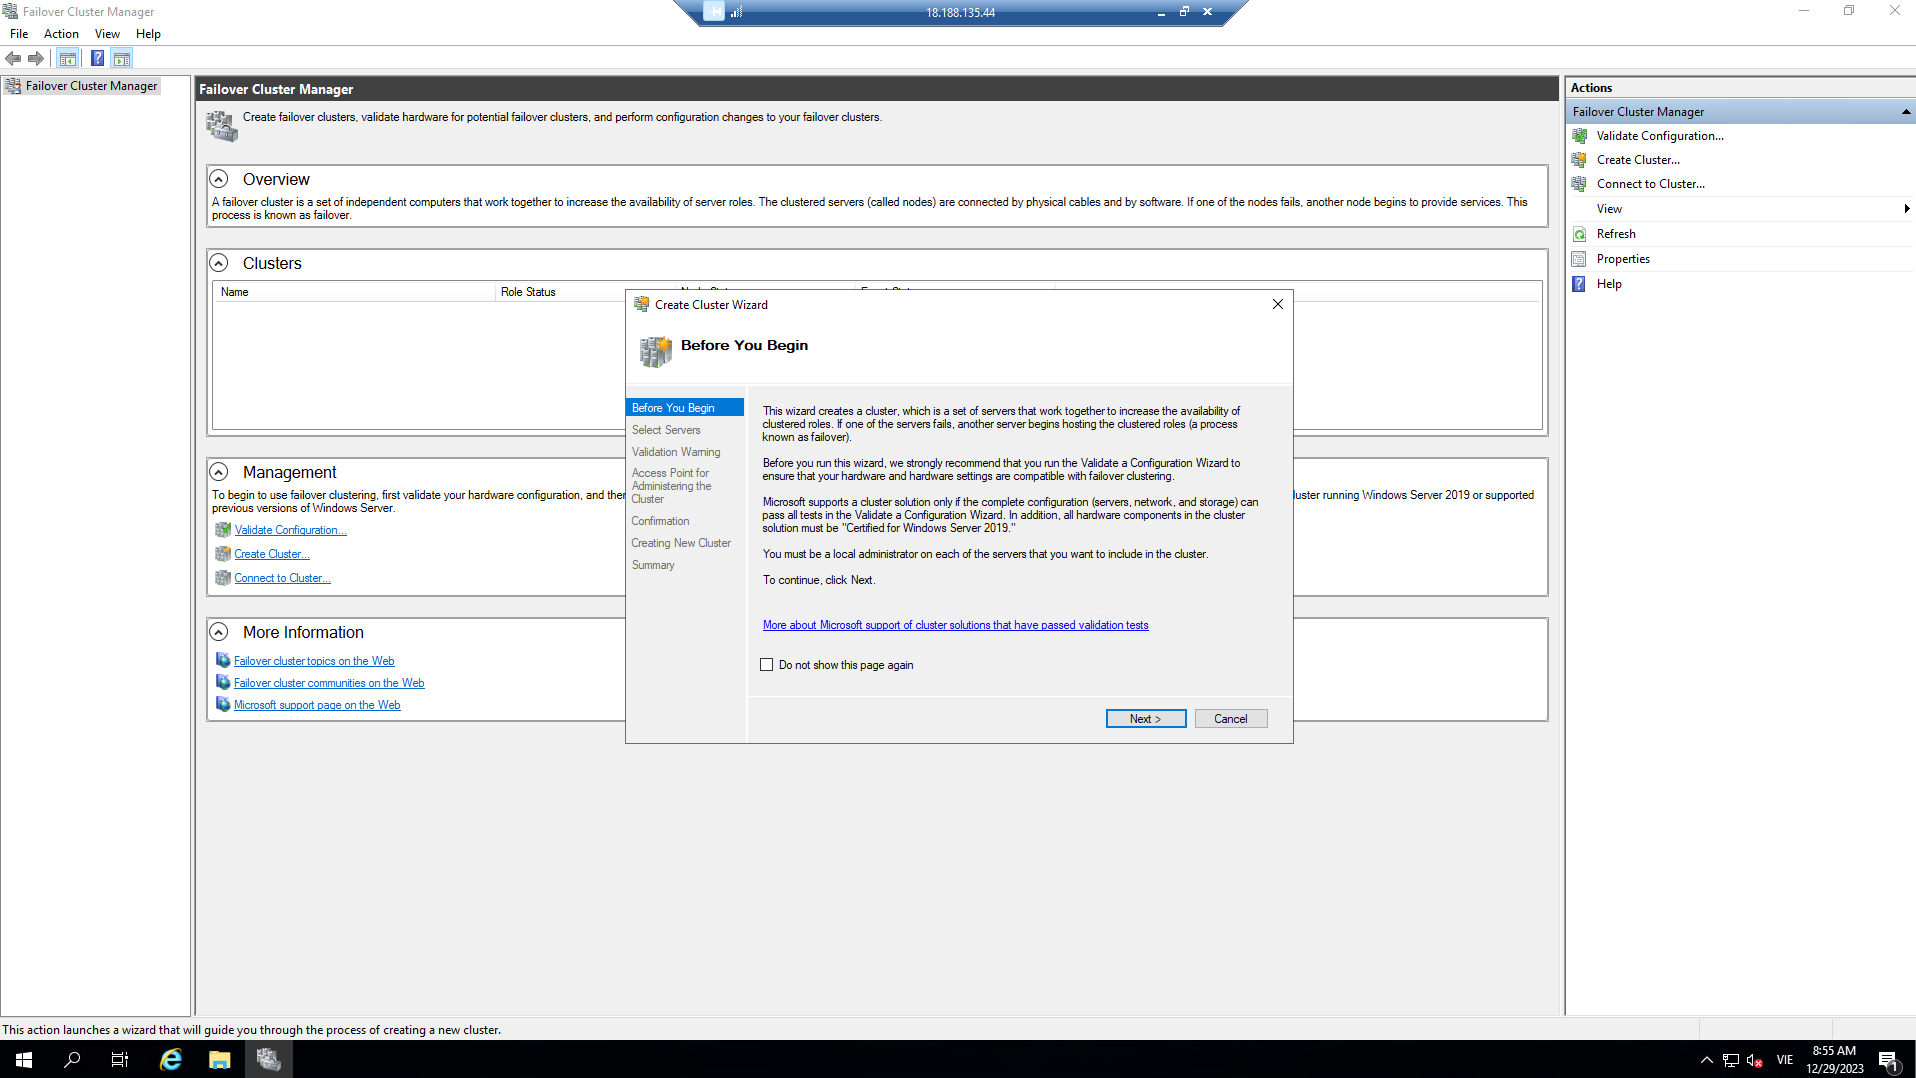
The Create Cluster wizard opens.

- On the Before You Begin page, select Next.
-
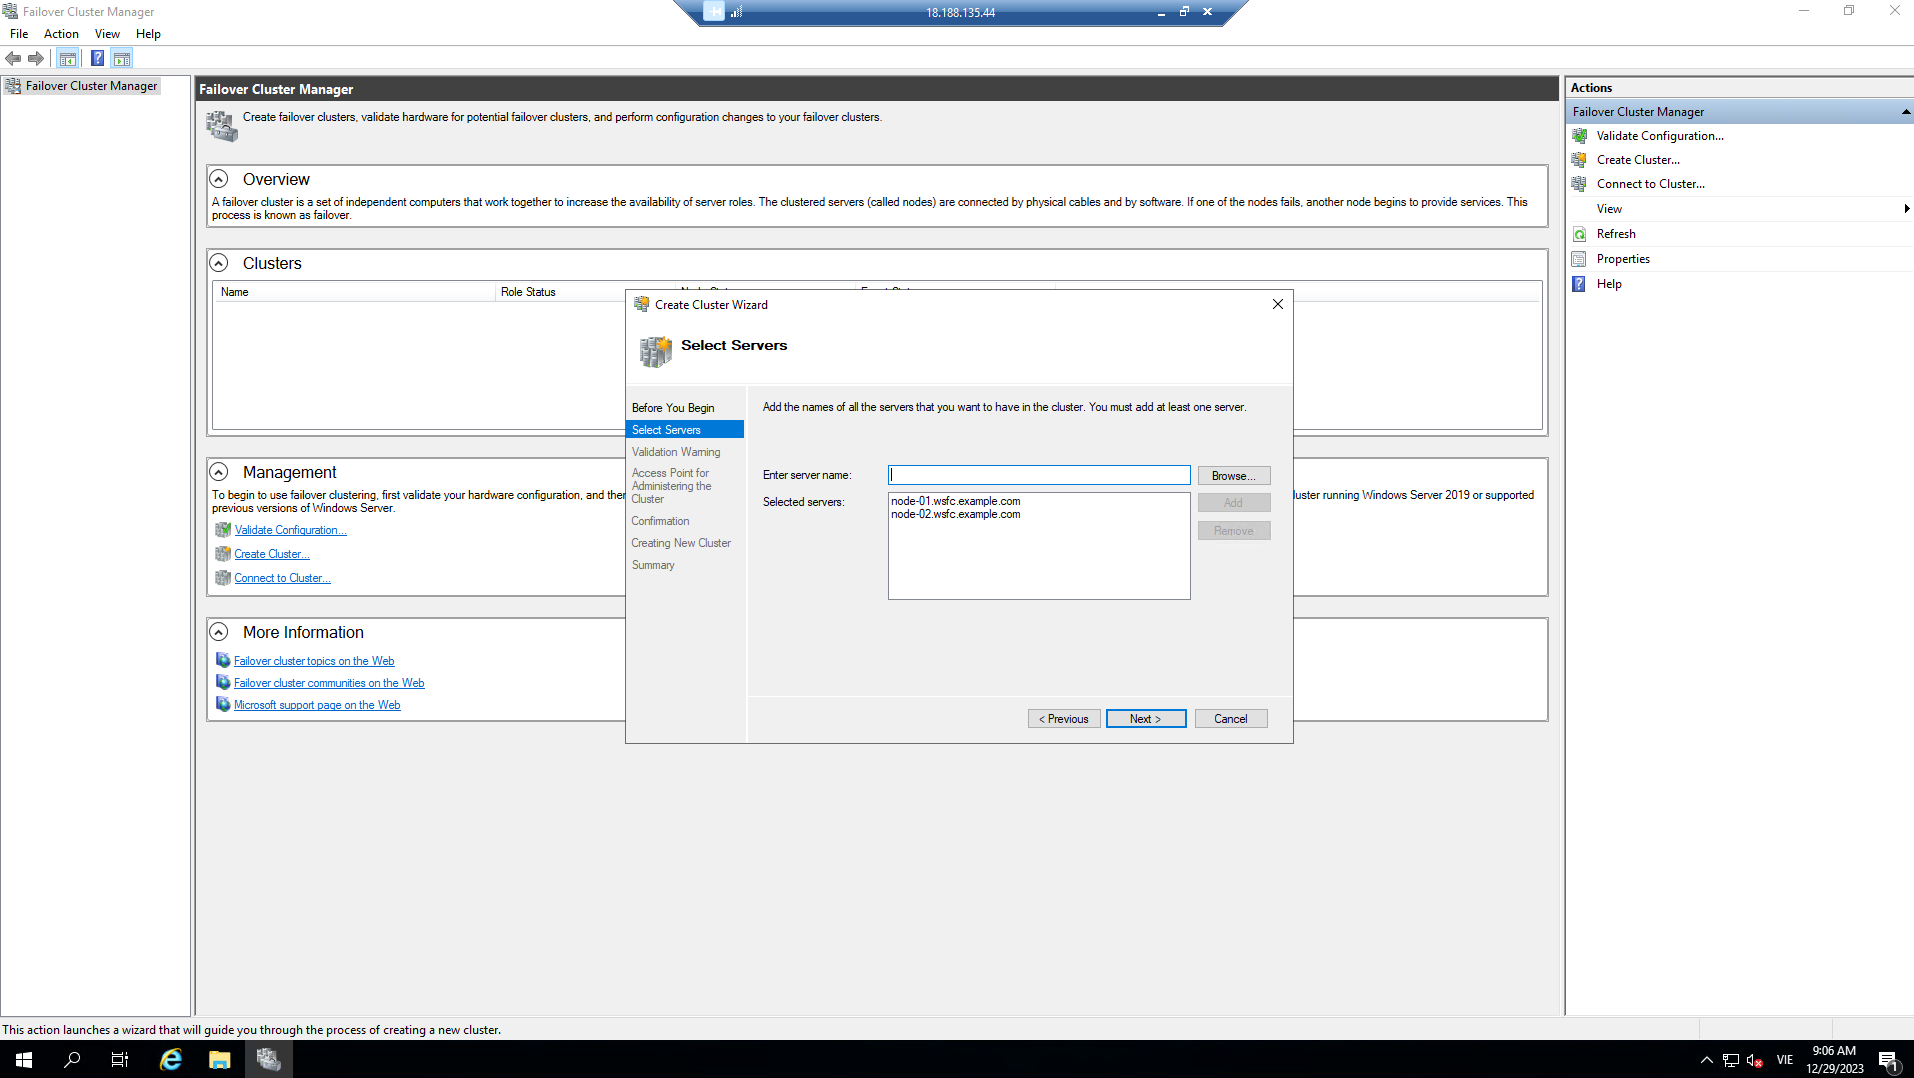
If the Select Servers page appears, in the Enter name box, type the NetBIOS or fully qualified domain name of a server you intend to add as a failover cluster node and then select Add. Repeat this step for each server you want to add. To add multiple servers at the same time, separate the names with commas or semicolons. For example, type names in the format node-01.wsfc.example.com; node-02.wsfc.example.com. When finished, select Next.
Note: If you chose to create the cluster immediately after running the built-in tests in the configuration verification process, you will not see the Select Servers page. The nodes that were part of the built-in tests will automatically be added to the Create Cluster Wizard so you do not need to re-enter them.
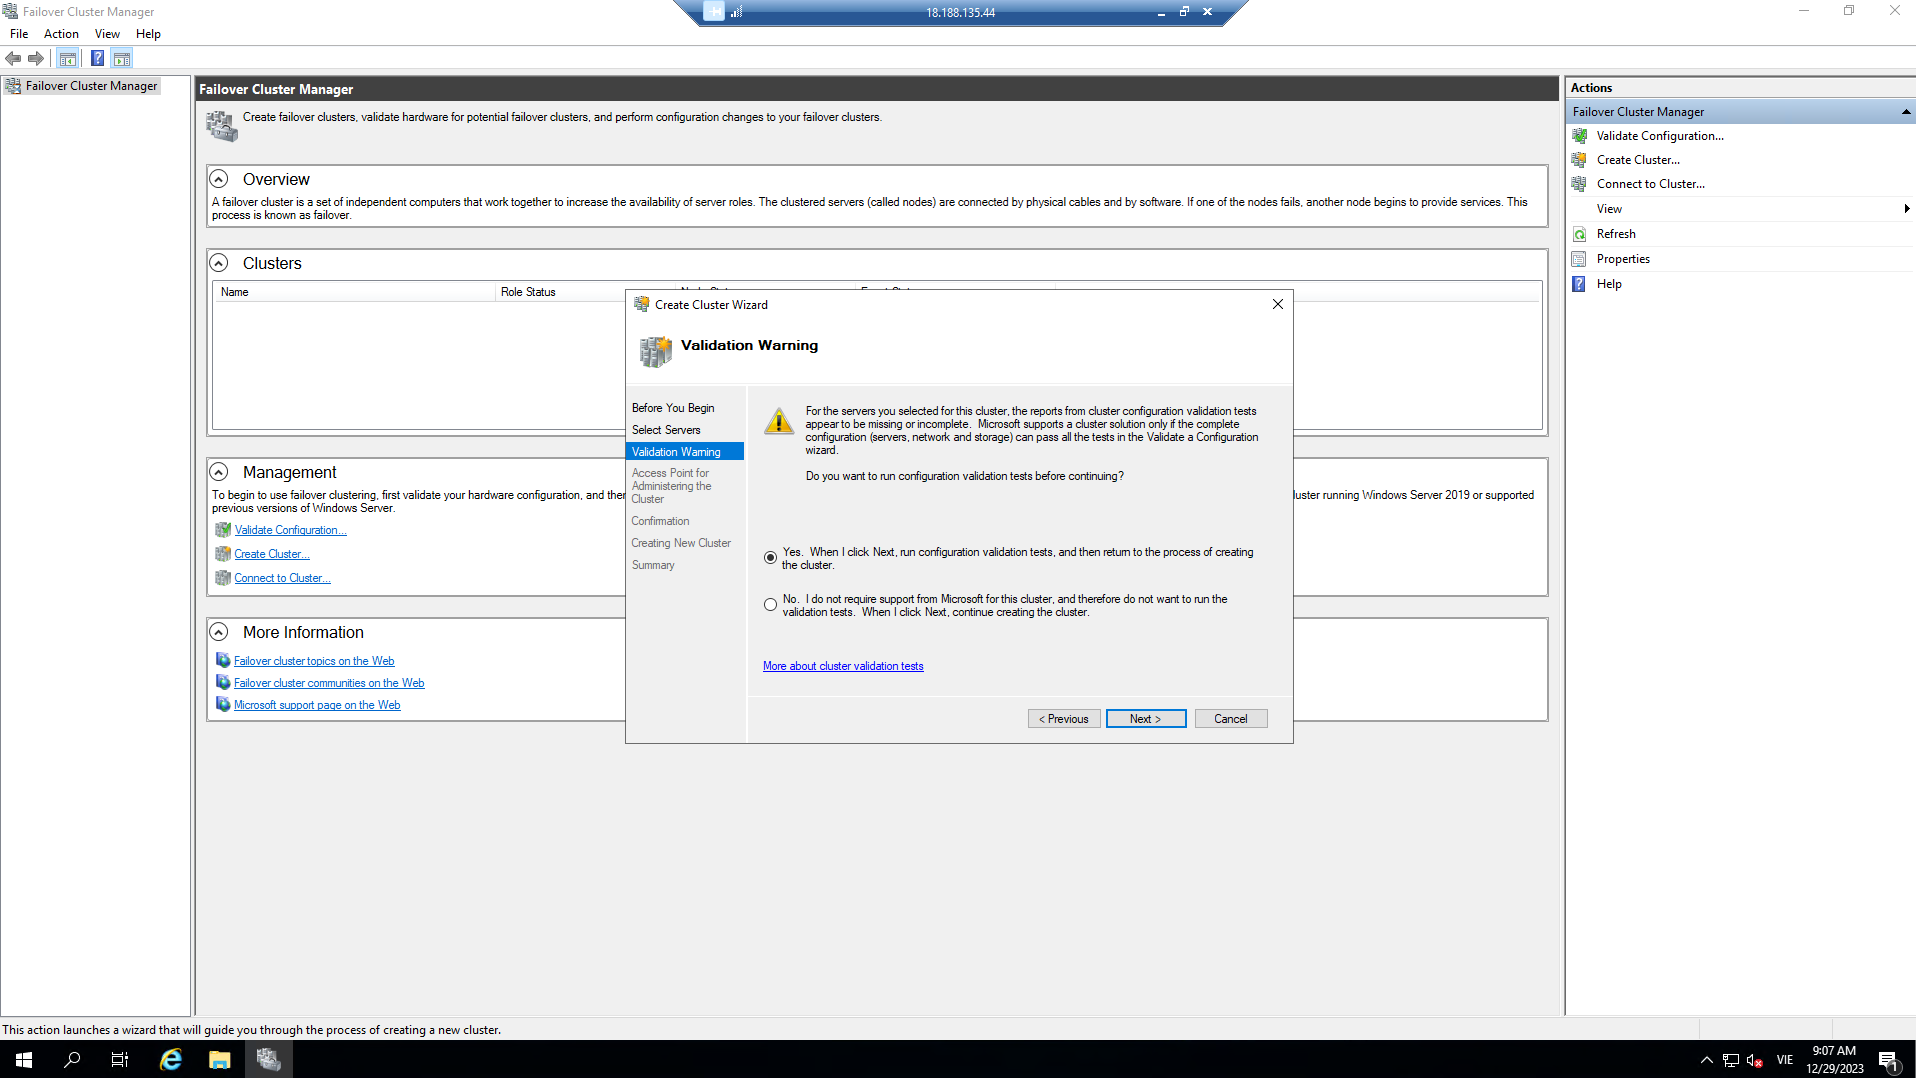
- If you skipped the built-in tests earlier, the Validation Warning page appears. We strongly advise you to run the cluster’s built-in tests. Only clusters that pass all the built-in tests are supported by Microsoft. To run the built-in tests, select Yes, and then select Next. Complete the Validate a Configuration Wizard as described in the Validate the configuration section.

-
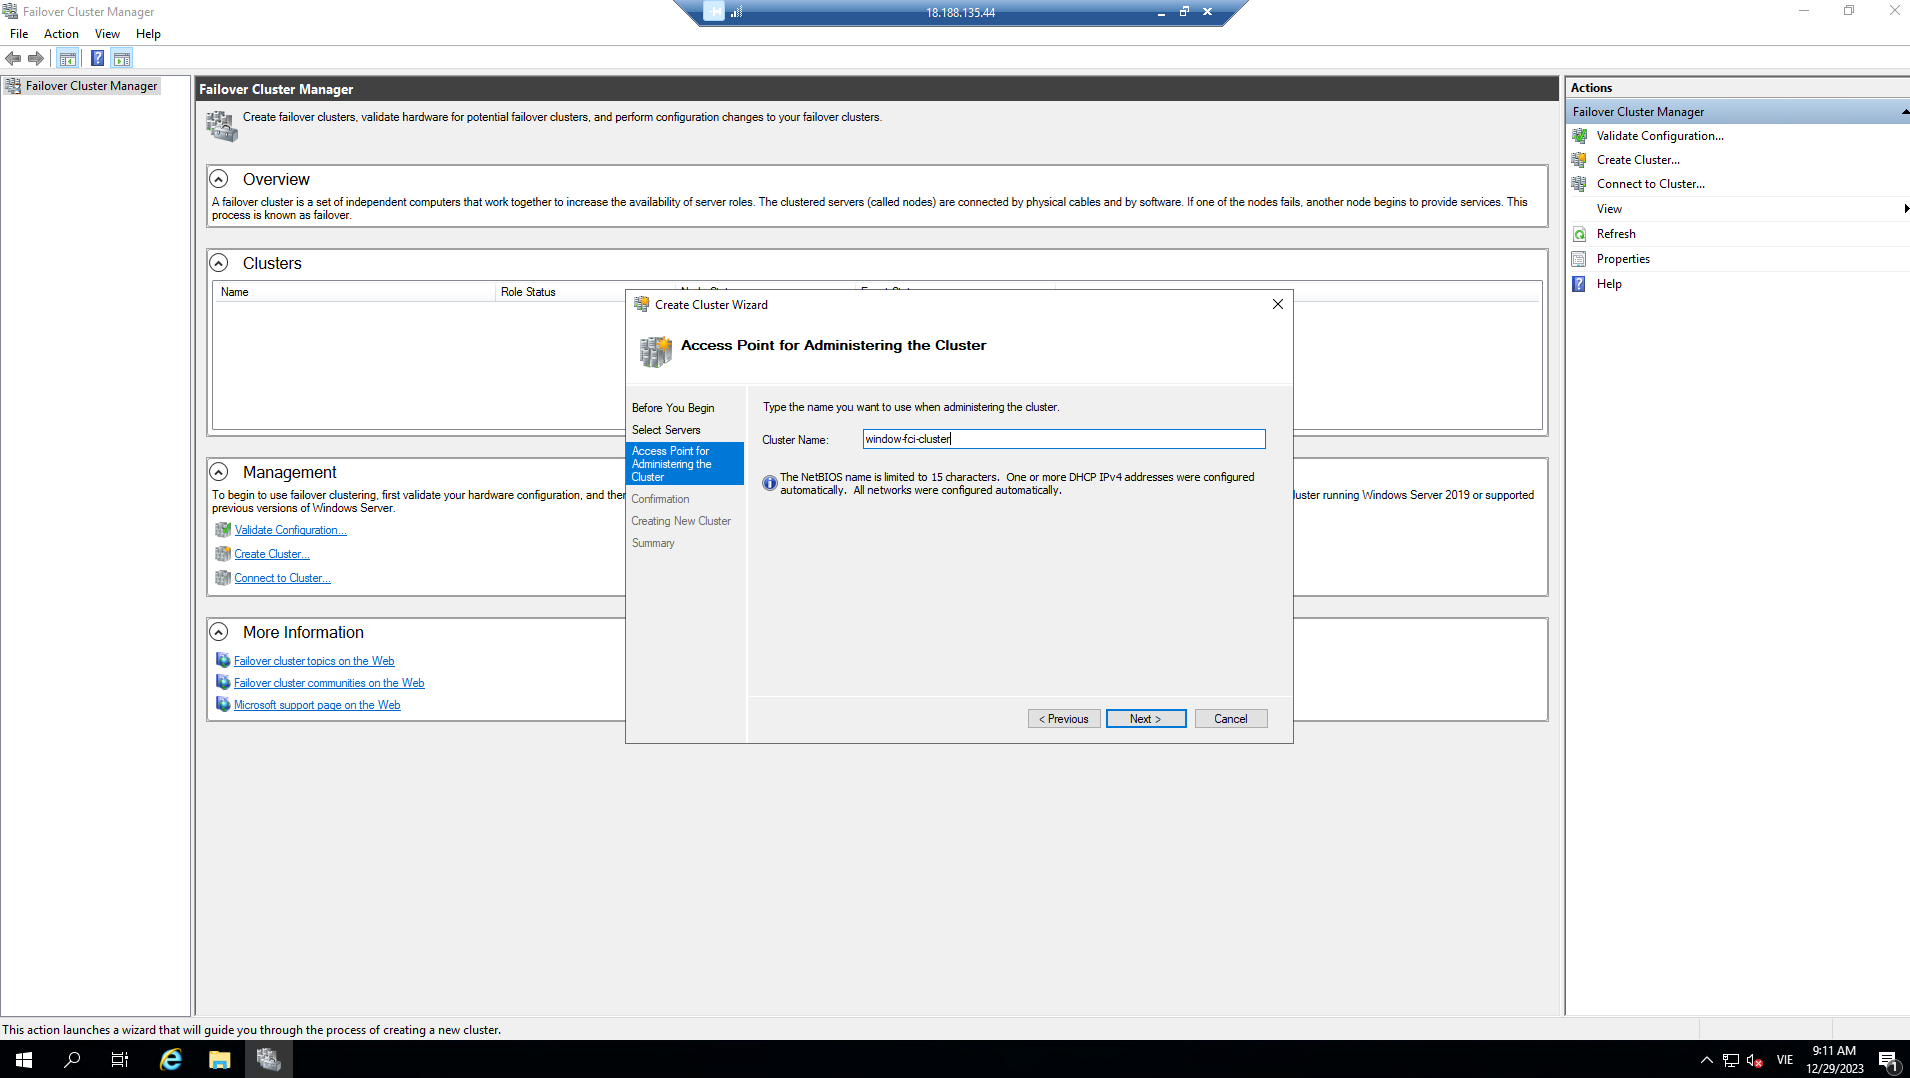
On the Access Point for Administering the Cluster page, do the following:
-
In the Cluster Name box, enter a name you want to use for administering the cluster. Before proceeding, consider the following information:
- During the cluster creation process, this name is registered as the cluster computer object (also known as the cluster name object or CNO) in AD DS. If you specify a NetBIOS name for the cluster, the CNO is created in the same location where the computer objects for the cluster nodes exist. This could be the default Computers collection or an OU.
- To specify a different location for the CNO, you can enter the distinguished name of an OU in the Cluster Name box. For example: CN=ClusterName, OU=Clusters, DC=Contoso, DC=com.
- If a domain administrator pre-created the CNO in a different OU than where the cluster nodes exist, specify the distinguished name provided by the domain administrator.
-
If the server does not have a network adapter configured to use DHCP, you must configure one or more static IP addresses for the failover cluster. Check the box next to the network you want to use for cluster management. Select the Address field next to the chosen network and then enter the IP address you want to assign to the cluster. This IP address (or addresses) will be associated with the cluster name in the Domain Name System (DNS).
Note: If you are using Windows Server 2022, you have the option to use a distributed network name for the cluster. A distributed network name uses the IP addresses of the member servers instead of requiring a fixed, separate IP address for the cluster.
-
-
When finished, select Next.
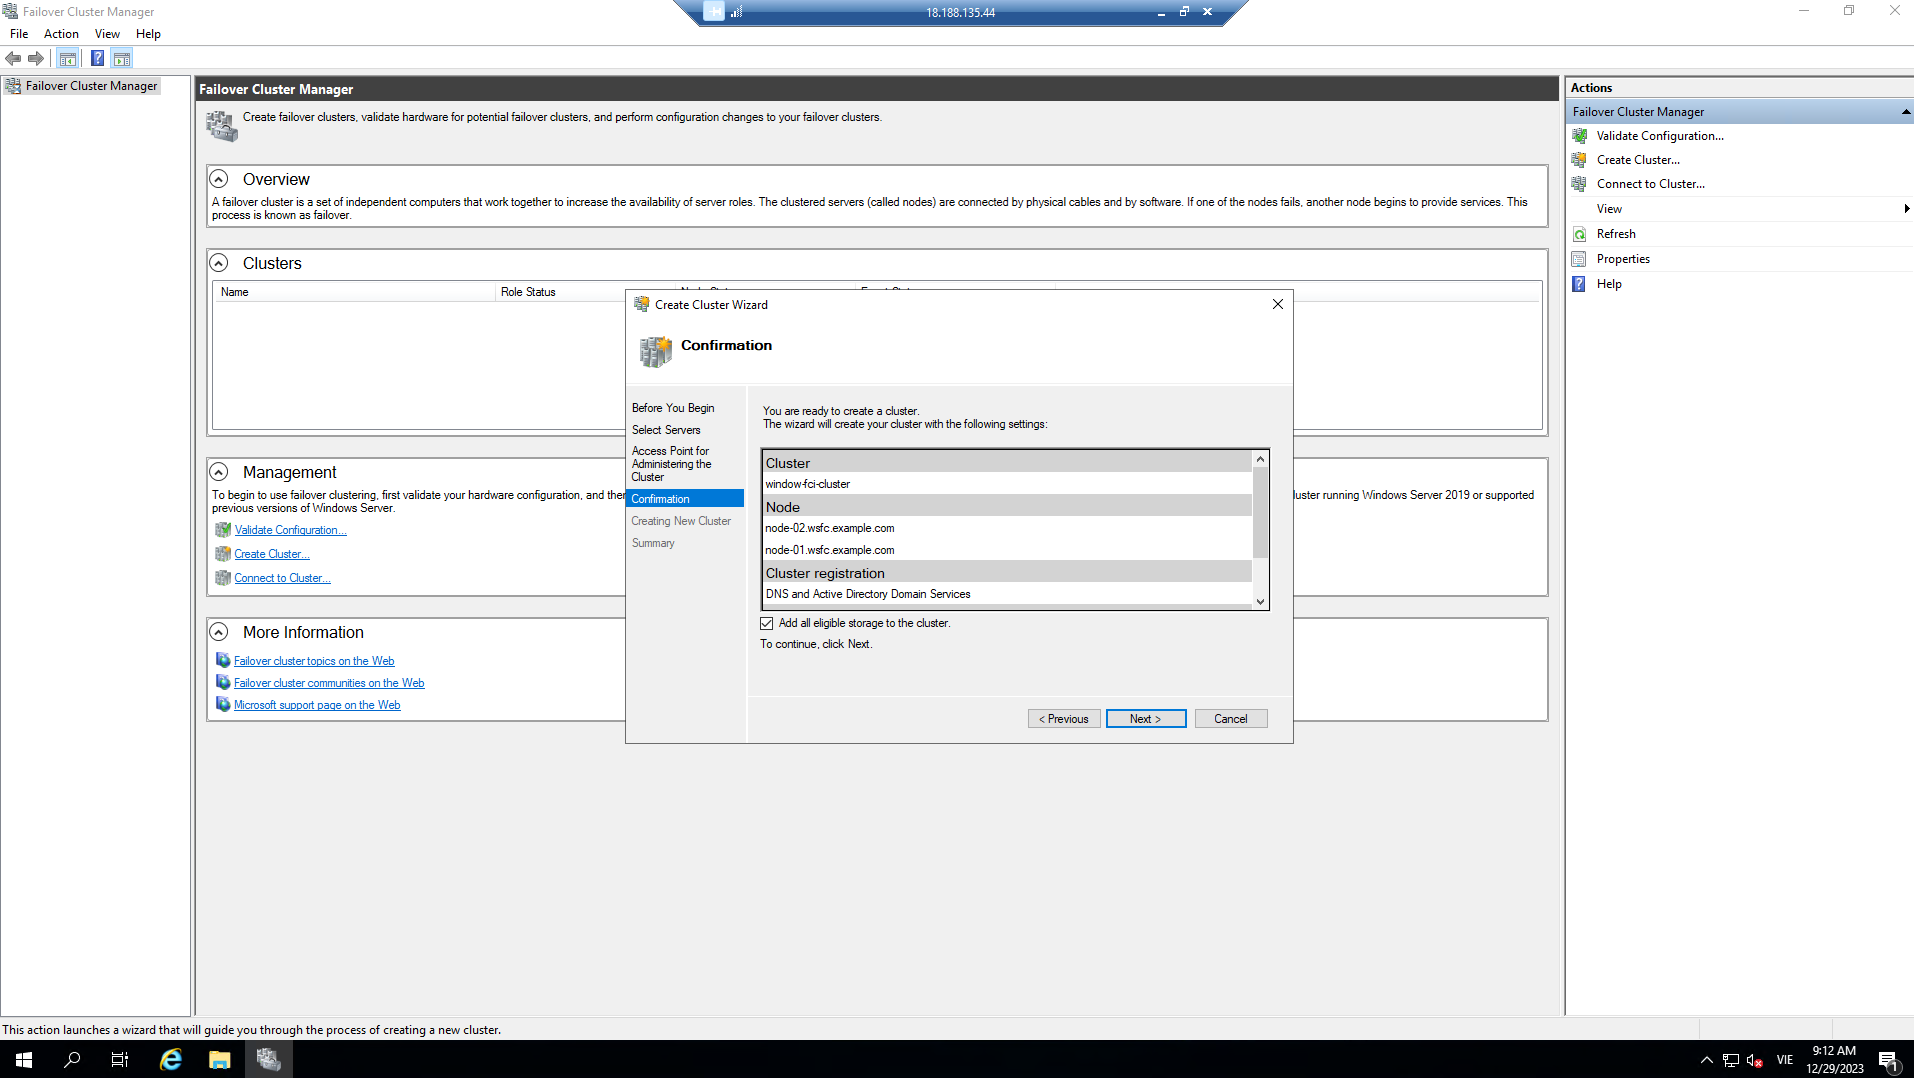
-
On the Confirmation page, review the settings. By default, the Add all eligible storage to the cluster checkbox is selected. Uncheck this box if you want to do one of the following:
- Configure storage later.
- Plan to create distributed storage spaces through Failover Cluster Manager or through Windows Failover Clustering PowerShell commands and have not created storage spaces in File and Storage Services. For more information, see Deploy Clustered Storage Spaces.
- Select Next to create the failover cluster.
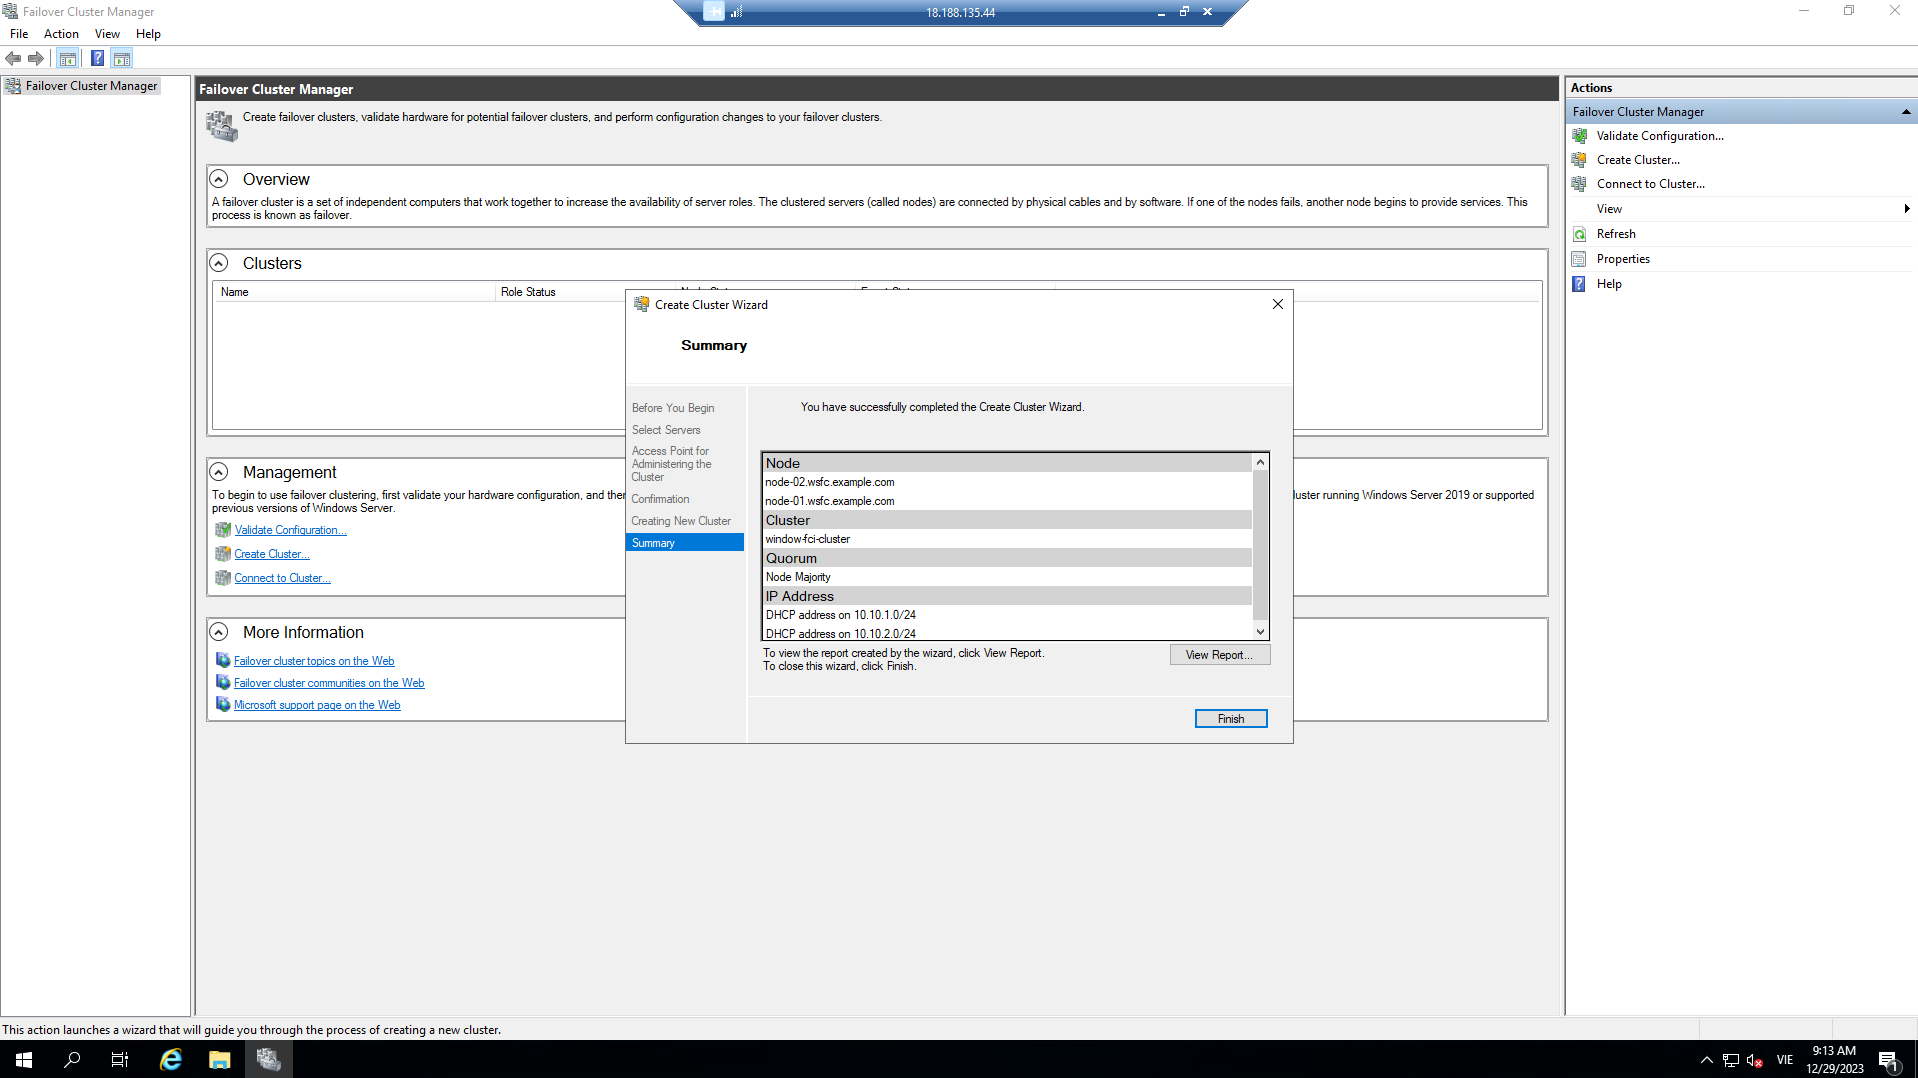
- On the Summary page, confirm that the failover cluster was created successfully. If there are any warnings or errors, review the summary output or select View Report to see the full report. Select Finish
-
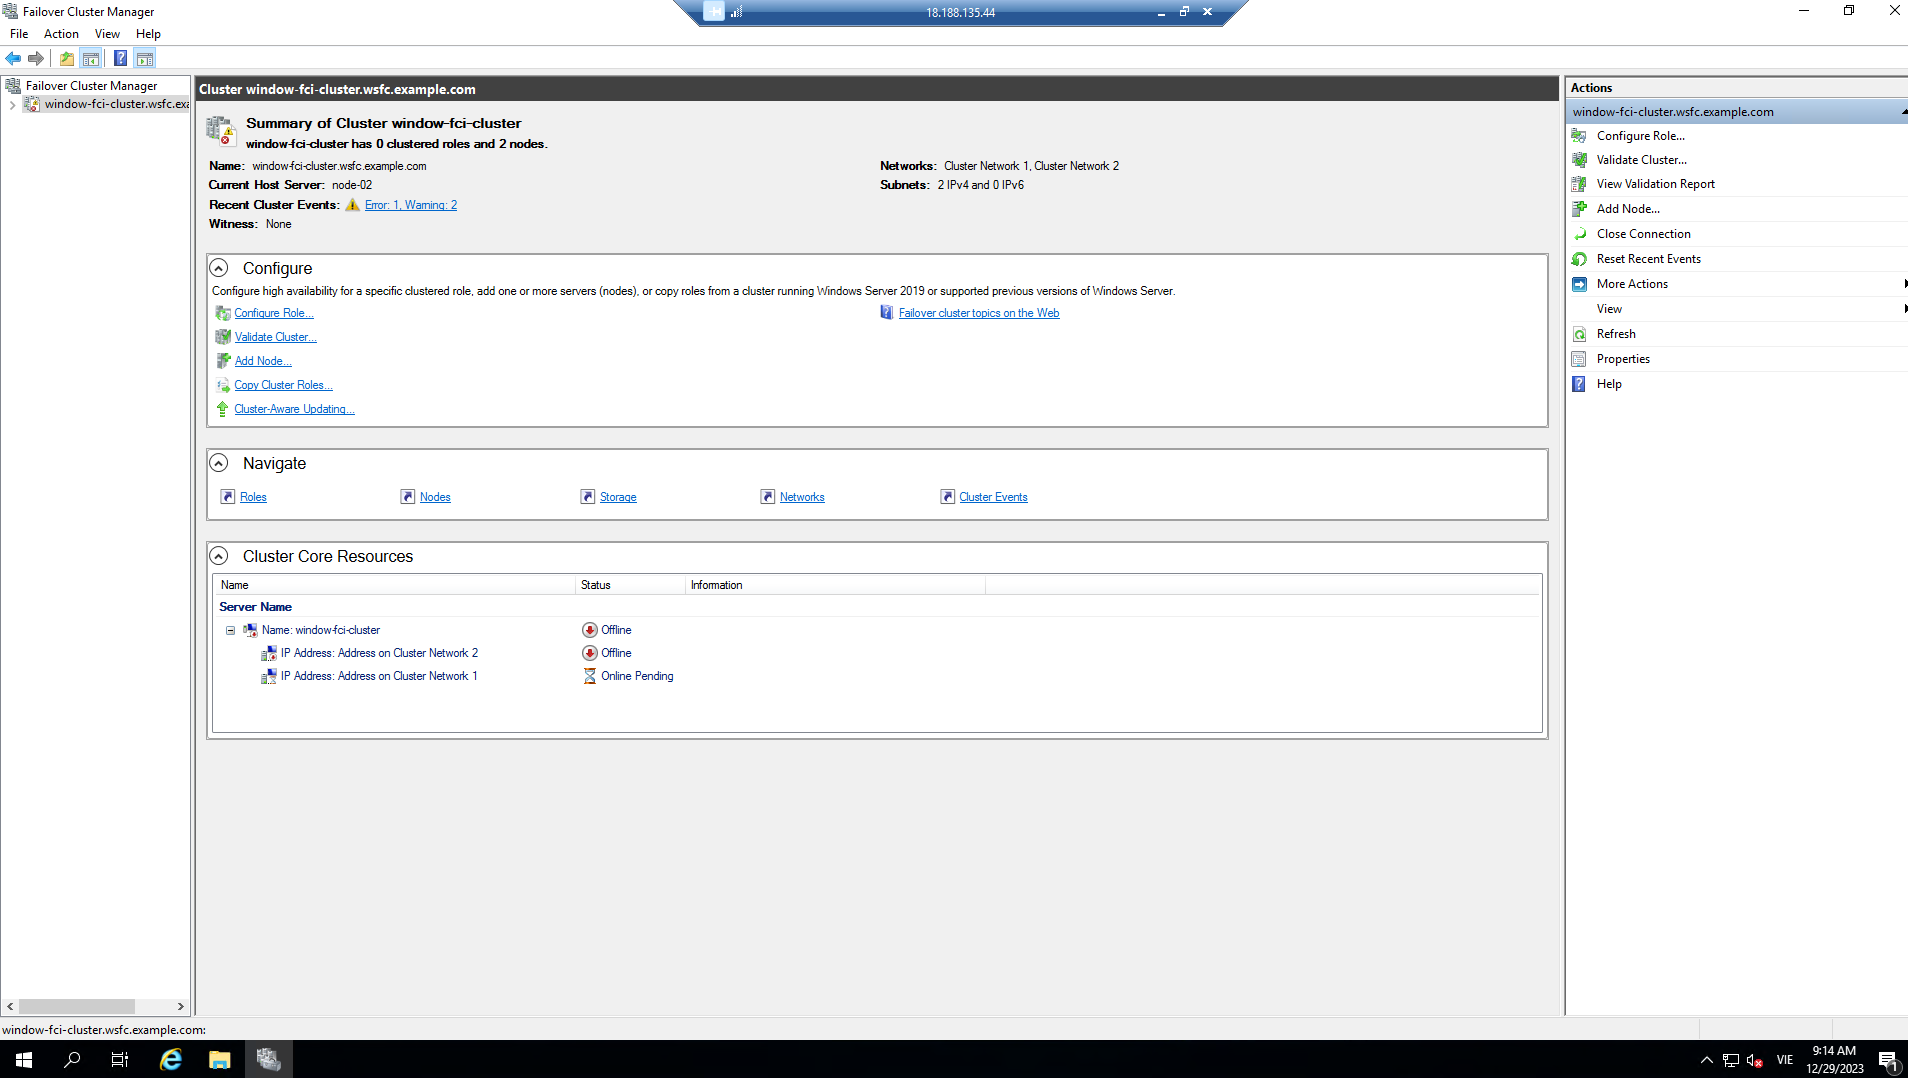
To confirm that the cluster was created, check if the cluster name is listed in Failover Cluster Manager in the navigation tree. You can expand the cluster name and then select items under Nodes, Storage, or Networks to view corresponding resources.
-
Understand that it may take some time for the cluster name to successfully replicate in DNS. Once registered and replicated in DNS successfully, if you select All Servers in Server Manager, the cluster name will be listed as a server with a Manageability status of Online.
-
After the cluster is created, you can perform activities such as verifying the cluster’s quorum configuration and optionally creating Cluster Shared Volumes (CSV). For more information, see Understanding Quorum in Storage Spaces Direct and Use Cluster Shared Volumes in a failover cluster.